It’s Never Too Early to Start Preparing for Print
By Izzy “Strontium” Hall
If you’re a new webcomic creator, printing a physical copy of your comic may feel like a far-off dream. But no matter how early you are in your webcomic journey, it’s never too early to start preparing for print!
Digital and print are two very different mediums, and transitioning from one to the other can be fraught with challenges. Fortunately, there are things you can do, even in the early days of your webcomic, to smooth the webcomic-to-print-file-to-physical-book process.
In this article, we’ll discuss tips that you can implement into your comic-making process now that will save you time and effort when eventually printing your webcomic.
Tip #1: Draw Your Comic at 300 DPI or Higher
If you’ve used a digital art program, you’ve probably seen the acronym dpi in the corner or at the top of your screen. “DPI” stands for “dots per inch” and refers to the resolution of a printed image. You can set a digital canvas’s dpi just as you would set the height and width.
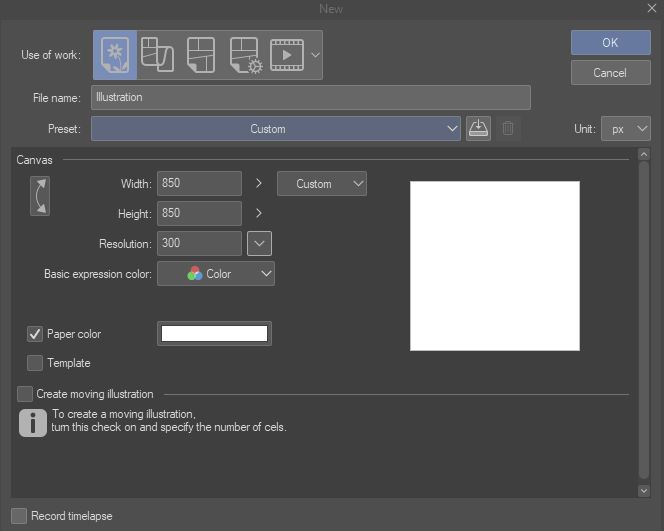
DPI doesn’t matter much when viewing digital images. A 72 dpi image will look just as crisp as a 300 dpi image when viewed on a computer screen. Sometimes a lower dpi is advantageous for art shared online, as less resolution means a smaller file size and faster loading.
On the flip side, dpi means everything in print. Commercial printers set the benchmark for printed images at 300 dpi and won’t accept files at lower resolutions. Therefore, if you want to someday print your comic, you absolutely need to work in canvases with a minimum of 300 dpi.
What if you’ve already drawn pages of your comic at a lower resolution? You may think you can go into your art program and adjust the resolution, much like you can adjust the width and height. Look, there’s even a menu to do so!
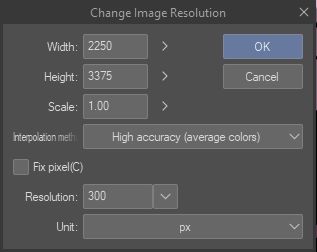
You can change the resolution of an existing image, but be warned. Digital art programs upscale the resolution of images by resampling them, which will distort the image and make it lose quality and detail. The canvas might have a higher resolution, but the drawing itself will be a smaller resolution stretched out to a higher one. Bottom line, it won’t look very good.
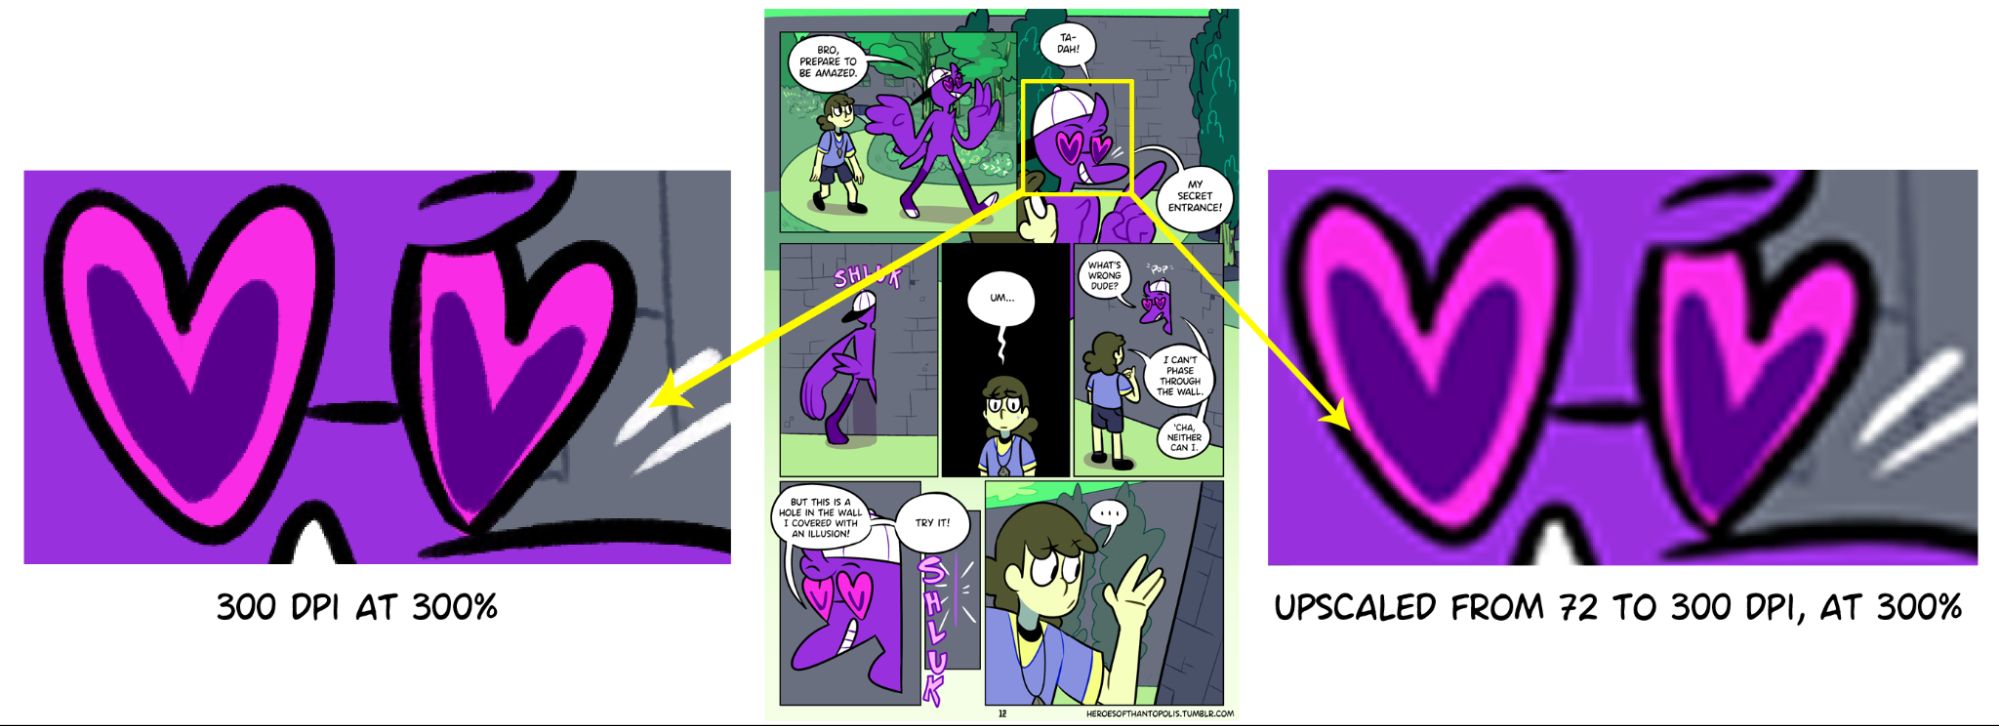
If you’ve found yourself in the unfortunate position of having drawn comic pages at a low dpi, you don’t have much of an option – outside of rolling the dice with AI upscaling tools – but to redraw the pages. There’s a reason we put this tip first on the list!
Tip #2: Give Your Webcomic Pages Consistent Margins
The “margin” is the area of white space between panels and the edge of the comic page. Content on the inside of the margin is considered “safe” and will reliably show up in print, while content that extends outside of the margin could get cut off in the printing process.
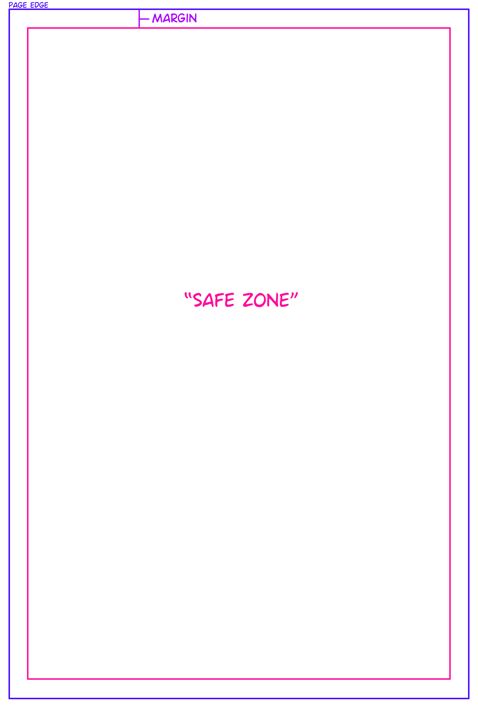
Though digital canvases allow artists to draw across the entire canvas, the practice of offsetting panels from the canvas edge has carried over from print comics to webcomics. And while webcomics can get funky with panel presentation, it’s a best practice for both digital and print to give your comic consistent panel margins. A good benchmark for margin size is between ⅛ and ¼ of an inch.
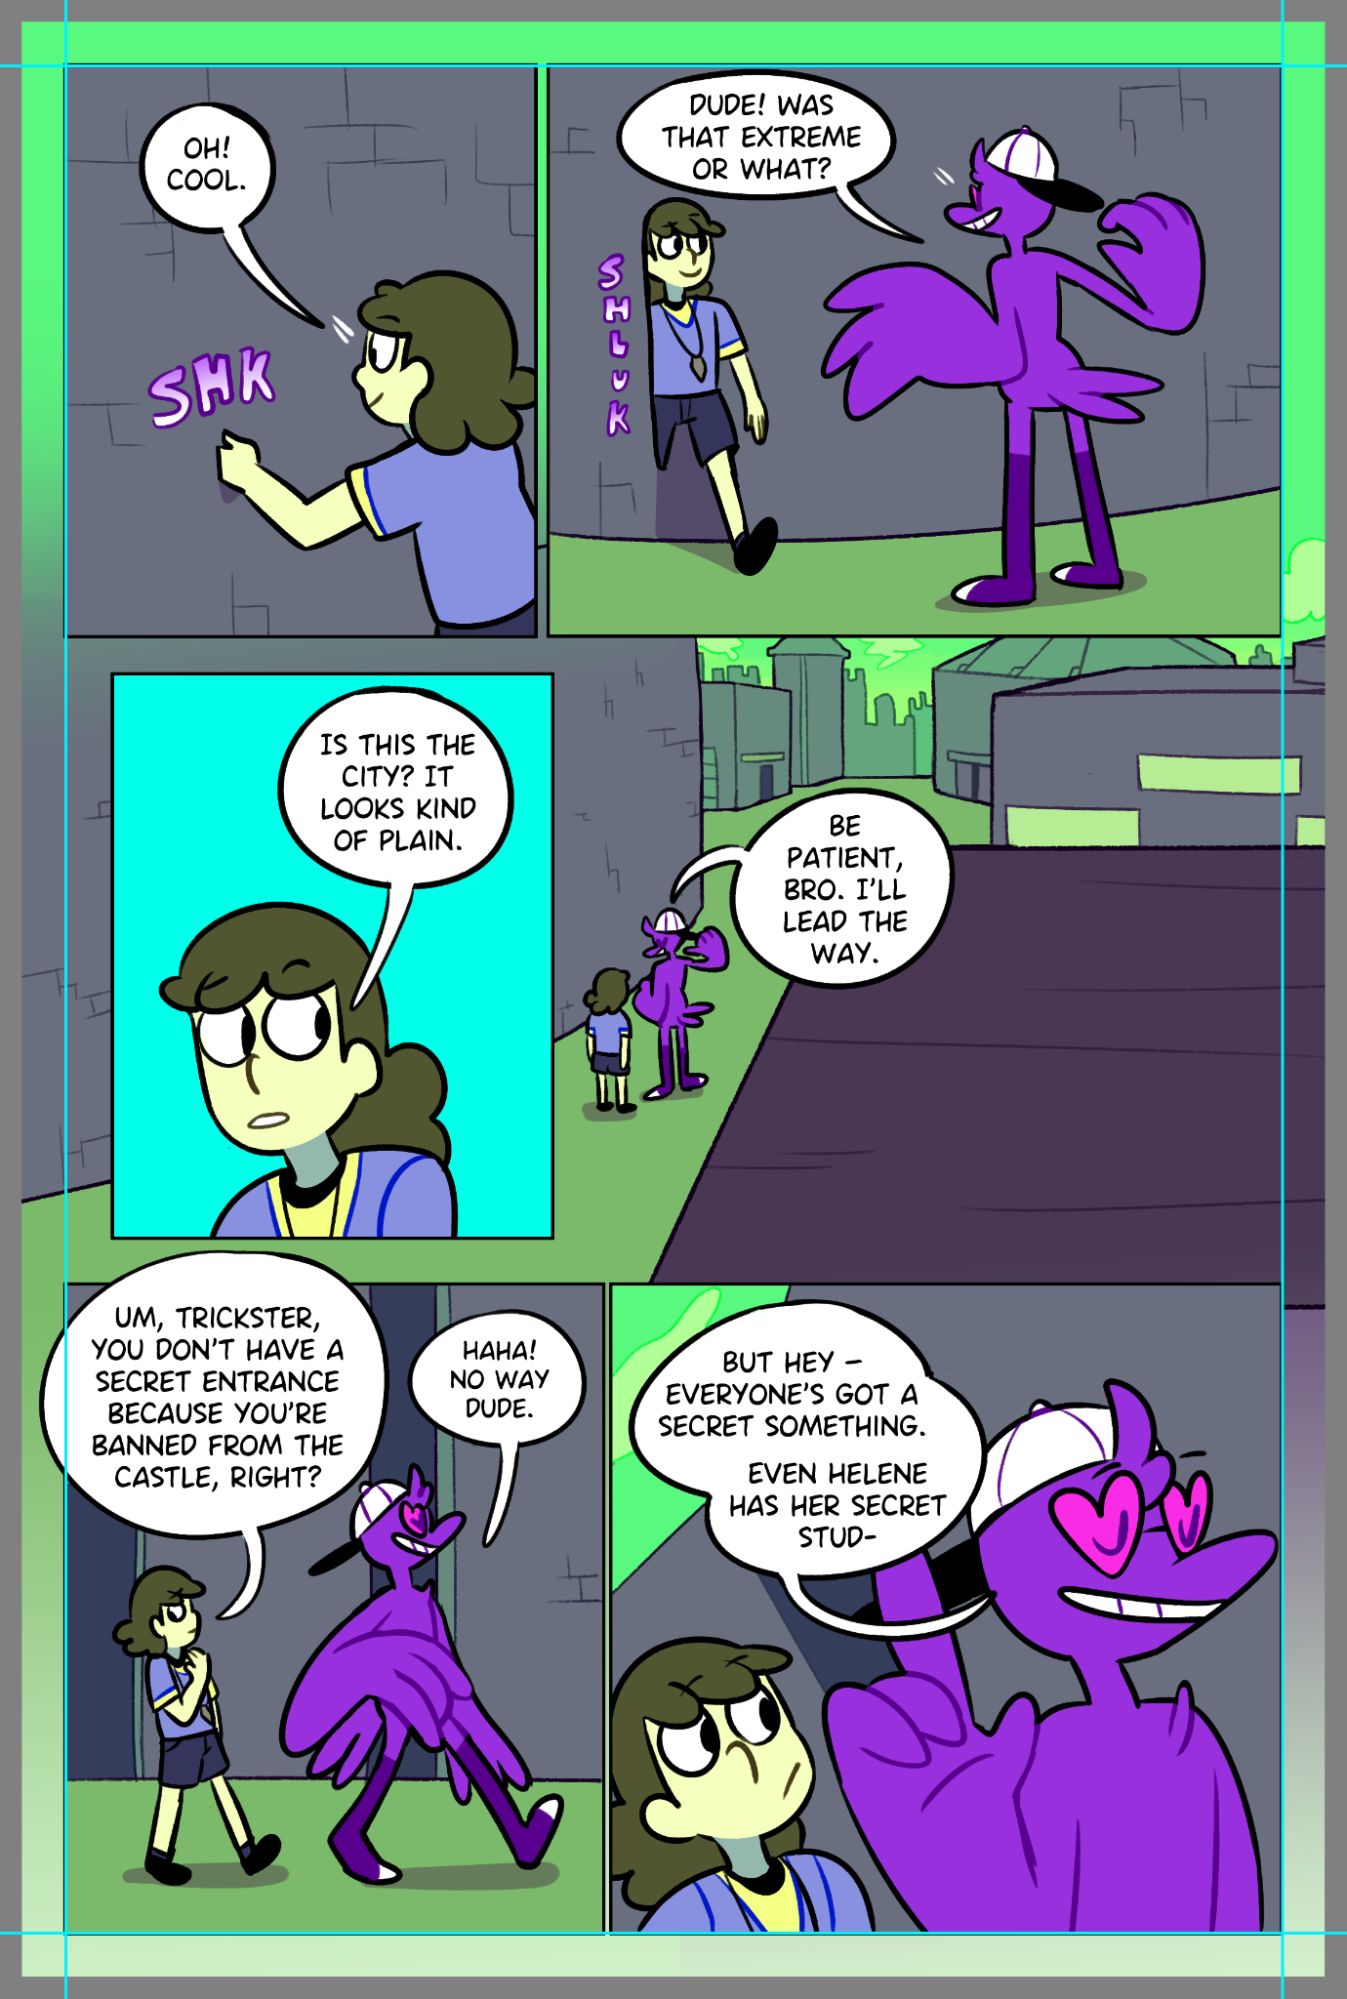
When setting up a print file for your comic, you’ll want the margin to be the same on all pages and to be consistent on all sides of the page (though some artists may add extra margin space on the side of the page that faces the spine). Consistent margins will make the printed work look professional and intentional.
What if your page’s artwork extends all the way to the edge of the canvas? That’s where bleed comes in. Bleed allows commercial printers to print right up to the edge of the page. This works by placing some of the bleed image outside of the margin, which will be cut off by the printer to give it that to-the-edges look.
More Reading: Mixam’s Full Bleed Printing Explained
Tip #3: Work at a Standard Paper Size
Digital canvases can be any dimension and still display properly on a digital screen. You may think paper can similarly be sized to any dimension – after all, it can be cut, right?
While paper can be cut into custom widths and heights, it’s best to create pages at dimensions that match or fit into a standard paper size. That way, you guarantee that the printer will have that paper on hand, ready for your artwork. The printer may even have a digital template for that paper size, pre-marked with margin and bleed, that you can use to set up the print file.
If you’re from the U.S., you’re probably familiar with letter, or “printer paper” size – 8.5 by 11 inches. Letter is just one of the standard paper sizes that commercial printers have on hand. Here are some of the options Mixam offers for their Graphic Novel printing:
| Standard Paper Name | Size (inch) |
|---|---|
| Letter | 8.5 x 11 |
| Digest | 5.5 x 8.5 |
| U.S. Trade | 6 x 9 |
| A4 | 8.3 x 11.7 |
| A5 | 5.8 x 8.3 |
It’s not a bad idea to print your comic at a smaller size than its original canvas size, especially if you use a lot of bleed. If the print pages are smaller, there’s more of the original art to go into the bleed without getting cut off.
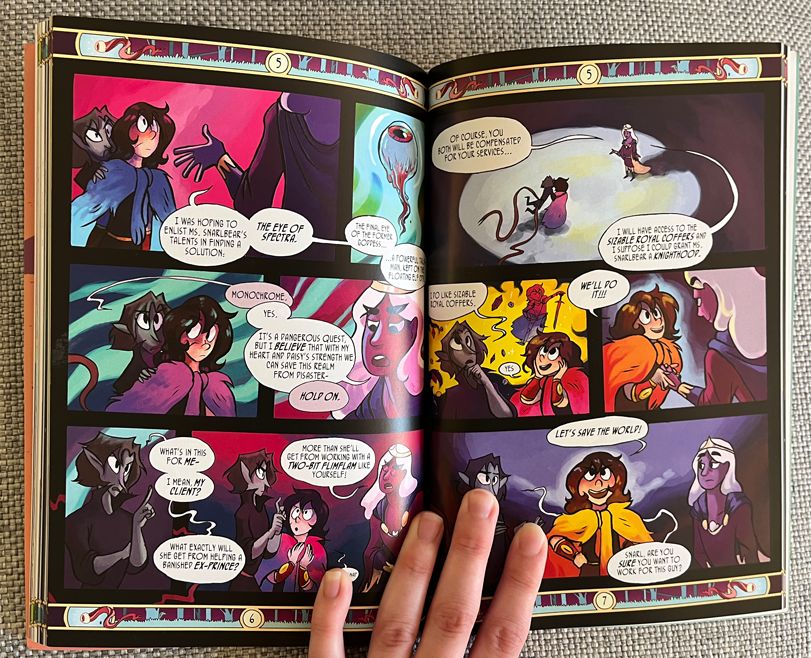
If you’ve drawn your webcomic at a non-standard size, you’ve got options. You can choose a printer that offers custom size printing, or, you can add embellishments to the page to increase its height or width to match a standard size. The printed version of Snarlbear offers a great example of the latter, placing decorative banners at the top and bottom of each page to fit the comic onto 6″×9″ paper:
Tip #4: Keep Text on Editable Layers
If you’re a webcomic artist who hand-letters every page, this tip won’t apply to you (also, you rock. Seriously). This tip is for those who use the Type tool: Keep those layers editable!
Art programs lay down text in vector, meaning the size of the font can be infinitely scaled and the text freely editable. When printing, you’ll want the vector layer to remain un-merged and editable when the final artwork is placed into the print file. This will keep text looking crisp and prevent it from bleeding into the artwork.
The other benefit to keeping text layers editable is that it allows you to go back and adjust text as needed – so you can fix typos, add or remove spaces or decide if a bubble should end with an em dash or an en dash. See our article on Things You Need (Besides Determination) to Start a Webcomic on keeping editable art files organized.
Conclusion
By following these best practices, you’ll create an excellent foundation for the eventual printing of your webcomic. Your future self will thank you!
Izzy “Strontium” Hall is a cartoonist, writer and creator of Heroes of Thantopolis. Follow them on tumblr or Bluesky.